Food Instagram How Many Photos Should You Upload
As a photographer you lot actually need to exist enlightened of the best way to save photos for Instagram. After all, you've spent so long creating that beautiful work, you need to share it!
The culling? Yous upload your beautifully shot and edited images to Instagram or wherever, so wonder why they take become all ugly and pixelated, or sunk without trace in the vast bounding main of Google Image Search.
I know which pick I prefer.
The algorithms used by Google, Instagram, Facebook etc. are mysterious entities though. And to avoid having your hard work ruined when you upload to social media, you really need to accept a skilful understanding of what's going on behind the scenes.
What are the all-time consign settings for Instagram and other social media for those who value image quality? And what other of import steps should you lot be taking in guild to go the virtually out of your images one time they are online?
No sweat! I explicate I everything you lot need to know in this guide to exporting and optimizing images for web and social media.
The Best Way to Save Photos for Instagram and Other Social Media
There are two primal stages to optimizing images for the web or social media: optimizing the photo files themselves, and then optimizing all the attributes of those files.
When these two steps are done properly, they are a very powerful tool that can bring an exponential amount of traffic to your website or food web log and guarantee that your images look their absolute best on social media. This post is going to intermission down both parts into clearly digestible sections, providing you with all the info you need to make the well-nigh of your photography online.
So if yous've ever wondered how to export photos for Instagram and other social media without compromising image quality, this guide is for you.
Earlier we leap in, download my gratuitous guide to optimizing nutrient photos for the web, so yous can come back to it whatever fourth dimension!

Free Resource
Free Resource
Optimize your Nutrient Photos for the Web
Optimize your Food Photos for the Spider web
Gratuitous Food Photography Optimization Checklist
Optimize your food photos for your nutrient blog or website and brand certain your site runs efficiently, without sacrificing any quality!
We respect your privacy. Past signing up, you agree to our apply of your name and email equally per our Privacy Policy
Gratuitous Nutrient Photography Optimization Checklist
Optimize your nutrient photos for your food weblog or website and make sure your site runs efficiently, without sacrificing any quality!
We respect your privacy. By signing up, you agree to our apply of your name and electronic mail every bit per our Privacy Policy
Which Settings Should You lot Use When Yous Salve Images for Web and Social Media?
In this section I'll explain the best way to salve images for web, blogs, and especially for social media – doing information technology the right style from the commencement, so y'all tin avoid whatsoever nasty surprises farther downward the route.
Whether yous need to salve images for the web (for your website, or a web log, for example), or for social media apps such as Instagram, the goal is to aim for the best compromise betwixt prototype quality and file size.
Consign your photos too pocket-size, and they'll look a pixelated mess earlier yous've even begun. Output them besides big, however, and they'll either take forever to load on your website, or Instagram's algorithm volition vanquish them into oblivion in society to meet its strict size limit.
I'1000 going to spend the almost fourth dimension talking about how to save photos for Instagram – but because it is by far the well-nigh popular platform for sharing food photography, and so the majority of people volition need this info.
Don't worry if you prefer other social media platforms such as Pinterest or Facebook, though, as I will besides go into these. Even one-time-school food bloggers get a wait-in, besides!
Let's get to it!
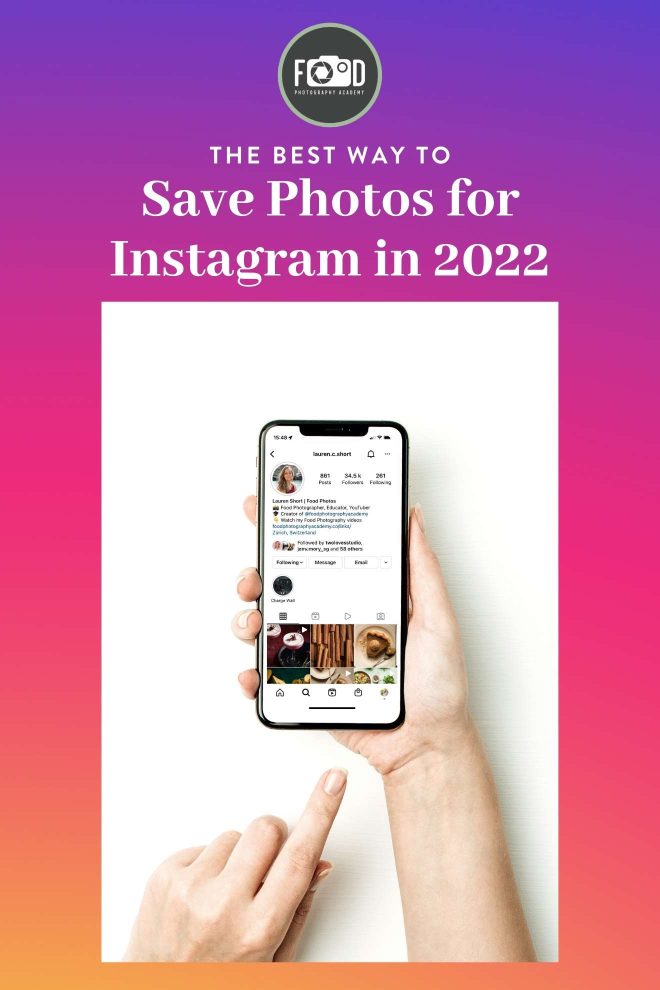
How to Save Photos for Instagram
One thing to go along in mind when yous salve photos for Instagram is that regardless of what yous might do to optimize your images, ultimately the algorithm has the final say. Significant that, firstly, the algorithm treats all images the mode it has been programmed to do, whether you like it or not. And, secondly, the way the algorithm is programmed to behave could alter without find.
In fact, as Instagram generally don't share this information with users anyway, you'll accept no style of knowing if and when things do change; other than from the results.
However, this doesn't mean that the results are entirely out of your command. Instead when you lot save photos for Instagram, you simply need to work with the algorithm every bit much as you can, rather than against it.
Here's what we currently know about the Instagram algorithm, and how to save your photos for Instagram and then that they come out the other end relatively unscathed. Where I accept whatever doubts nigh the information provided, I've tried to note this. And in such cases I encourage yous to test out the communication for yourself.
That said and done, here are all the most important steps to have when you lot save photos for Instagram and other social media platforms.
Sharpening
Before you lot striking the "export" button and start inputting all the settings recommended below, a piddling sharpening is essential in guild to stop up with images that still look detailed and high quality in one case on Instagram.
Thing is, though, sharpening will typically make sure areas of an image (those with a lot of fine item) wait great, while making others (those lacking detail or including soft transitions) wait absolutely atrocious.
The solution is non to just acuminate the entire image, just to be selective in where you lot apply your sharpening. And the undercover to achieving this is masking.
Holding down the Alt key in the sharpening tool in Lightroom will let you to mask the sharpening you apply to only the areas of highest contrast. White areas will be effected by the sharpening, while anywhere that'southward black will remain untouched.
Read my top 5 Lightroom Editing Tips here!
Now y'all can become any highly detailed and of import areas of your photograph – for example the main point of focus on your hero dish – looking super precipitous, while the residuum of the epitome remains smooth, natural-looking, and gratuitous from ugly artifacts.
Compression
Any photos you lot upload to Instagram will be compressed by the algorithm. Even if you lot've already compressed your files when you saved them, they'll be compressed once more. There doesn't seem to be any style of getting around this.
True, you'll run across people saying that if your images are under a sure limit (I've seen 500kb mentioned, I've fifty-fifty seen 638kb) they'll escape the scrap-crunching wrath of the algorithm. But you'll likewise come up beyond others swearing that file size makes absolutely no difference to the concluding results whatsoever.
If that'due south really the case, it would seem amend to upload your images to Instagram uncompressed. And just let the algorithm practise its thing – it's going to do information technology anyhow, after all. That way your images only become crushed once.
Simply having tested this theory for myself – uploading an image that came in at just over 600kb, and some other that was well over 1mb – information technology actually seems to me that the smaller epitome looked better in one case on Instagram.
In short, the official line is that it makes no difference how big your file is when you upload it to Instagram. But in do I'm not sure that this is really true.
I personally export my images at 100% quality at the correct pixel size, which we'll come to shortly.
Ingather Ratio
With Instagram y'all take a few options when it comes to the crop ratio of your images. Square (1:ane), vertical (4:v), and horizontal (iv:iii).
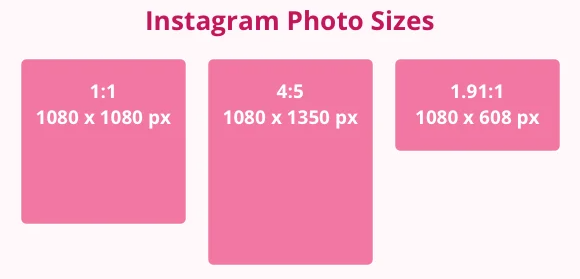
Of these, vertical occupies the most pixels, so will work out to be the best looking pick in terms of paradigm quality and touch. Square also looks bully, but lacks the height of the vertical format. Meanwhile horizontal (landscape) images go shown relatively modest on Instagram and can easily be missed in people's feeds, and then I'd more often than not endeavor to avoid doing information technology this way. If necessary, before you salve horizontal photos for Instagram, place them on a square groundwork for greater impact.
Prototype Size
Instagram displays your photos at 1080px wide. As a consequence, y'all'll probably desire to consign your images 1080px broad too. This mode you avoid having the algorithm resize them to 1080px wide for you – potentially making a mess of your photograph in the process.
In practice this means that four:five ratio images should exist 1080px x 1350px. Or if your images are square, and so they'll demand to be 1080p x 1080px.
Note that some people recommend doubling the pixel dimensions of your file hither (i.e. the width becomes 2160px). The thinking behind this is that a 2160px file volition compress cleanly down to 1080px when uploaded, but give an impression of greater resolution.
Desire a quick reference guide to come back to? Download my free web optimization guide!
Gratuitous Resource
Costless Resource
Optimize your Nutrient Photos for the Web
Optimize your Food Photos for the Web
Free Food Photography Optimization Checklist
Optimize your food photos for your nutrient blog or website and make sure your site runs efficiently, without sacrificing any quality!
We respect your privacy. By signing upwards, yous hold to our use of your name and email as per our Privacy Policy
Free Food Photography Optimization Checklist
Optimize your food photos for your nutrient blog or website and make sure your site runs efficiently, without sacrificing whatever quality!
We respect your privacy. By signing upward, yous agree to our use of your name and email as per our Privacy Policy
Color Space
This is uncomplicated; if you're editing an paradigm that volition remain in the digital realm (i.eastward. information technology won't exist printed), you should always work in the sRGB color space. And naturally when you relieve photos for Instagram, you lot remain totally digital, so you lot should always select the sRGB option when outputting.
Export Settings for Web and Social
If you're using Adobe Lightroom or Photoshop to edit your food photos (which I highly recommend you lot practise!), at that place are handy congenital-in functions to help export your photos with the right settings, including paradigm quality and file size.
In a minute I'll provide quick-reference tips for exporting images for spider web and social from Lightroom and Photoshop. Beginning, though, here are some general guidelines to follow when you save images for the spider web.
Exporting from Photoshop
Once you've finished your edits, go to File → Consign Equally, to consign your photo.
Now yous'll be presented with the Save for Spider web screen, where you can cull the file type, epitome quality, and dimensions of your exported photo.
Y'all should select the JPEG format, then use the quality slider to reduce the quality of your photo. Don't be scared of reducing the quality! You tin can take JPEG files down to approximately 65 before noticing any visible deviation at all.
Photoshop offers a preview window on the left, that y'all can utilize to zoom in on your image and meet how information technology's looking at your chosen quality level. This can salve yous hundreds of kilobytes of file size without altering the wait of your image in whatever style.
Finally, use the image size boxes on the lesser right to set the right dimensions for your website.
Exporting from Lightroom
The same settings are available in Lightroom when you lot choose File → Export.
Simply as in Photoshop, y'all should select JPEG as your paradigm format in the "file settings" section, and employ the slider to cull your quality. Annoyingly, Lightroom doesn't offer a preview role, so you lot will merely need to play around on a few files to effigy out which quality works best for yous. I at present utilise 100 on the quality slider, with a resize of "curt border" to 1080px for a portrait paradigm.
TL;DR Image Export Settings
I appreciate that not everyone volition desire to dive into the the deep cease when they relieve photos for Instagram, Facebook, etc. And fifty-fifty those that do might capeesh a quick-reference reminder to refer back to in the future. That being the case, here are a few basic checklists for when prepping your images for social media.
Instagram Export Settings Lightroom
Just looking for a quick checklist of the best Instagram export settings for Lightroom, without getting lost in the finer details? Well, here you get:
- Open the Export Tool
- Colour space: sRGB
- 4:five or ane:1 crop ratio
- Resize image to a width of 1080px (or 2160px: encounter above)
- Output as JPEG
- Quality: 100 (just see the Pinch section above)
- Resize to "brusk edge 1,080px" for portrait images
- Whatever file size (but larger files will exist slower to upload, and see Compression above)
- Output sharpening: Sharpen for Screen. Amount: Standard
Instagram Export Settings Photoshop
Simply came here for a quick checklist of standard Instagram export settings for Photoshop? Got you covered, also:
- Get to File → Export → Save for Web (legacy)
- Colour space: sRGB
- 4:5 or 1:1 crop ratio
- Resize image to a width of 1080px (or 2160px; see Prototype Size department above)
- Output as JPEG
- Quality: 100/Maximum (but run across the Compression section above)
- Whatever resolution
- Any file size (but larger files volition be slower to upload, and see Compression above)
- Cheque: Optimized
- Quality: Bicubic Sharper
Other Web and Social Media Image Export Settings
Optimize Images for Facebook in Lightroom
Here are quick-reference guidelines explaining how to optimize images for Facebook using Lightroom:
- Go to Export at the bottom left corner of the Library module screen
- Colour space: sRGB
- 4:5 or 1:one crop ratio
- Resize image to a width of 2048px
- Output as JPEG
- Resize to Fit: check this and choose Long Edge
- Any file size (only larger files will be slower to upload)
- Output sharpening: Sharpen for Screen. Amount: Standard
Optimize Images for Pinterest
Looking to optimize your images for Pinterest? These settings will requite you the best Pinterest Pin sizes.
- Vertical prototype, 2:3 crop ratio, resize to 1000px x 1,500px in summit or 600px x 900px
- Square image, ane:1 crop ratio, resize to 1000px x 1000px, or 600px x 600px
- Long paradigm, ane:21 crop ratio, 1000px 10 2,100px, or 600px x 1260px
- Colour space: sRGB
- Output as JPEG
- Max file size 32mb
- Output sharpening: Sharpen for Screen. Amount: Standard
Desire my gratuitous spider web export guide? Download it here!
Gratis Resource
Free Resource
Optimize your Nutrient Photos for the Web
Optimize your Food Photos for the Spider web
Gratuitous Food Photography Optimization Checklist
Optimize your food photos for your food blog or website and make sure your site runs efficiently, without sacrificing any quality!
Nosotros respect your privacy. Past signing up, you agree to our utilize of your proper noun and email as per our Privacy Policy
Gratis Food Photography Optimization Checklist
Optimize your food photos for your food blog or website and make certain your site runs efficiently, without sacrificing any quality!
We respect your privacy. By signing upwardly, you agree to our utilise of your proper noun and email as per our Privacy Policy
How to Save Images for Websites and Blogs
When you save images for web usage – websites, blogs etc. – you lot take a little more room to maneuver than with most social media platforms. Here, no intolerant algorithm is going to squash your images downwards to size for being even a few kilobytes over an arbitrary file limit.
All the same, yous shouldn't take this as permission to upload gigantic files. As a food blogger, your photos are probably the largest files you host on your website, and are therefore the biggest culprit in slowing down loading times.
Call up that this isn't a major issue? Consider that most people volition only expect three seconds for a website to load earlier losing interest and clicking somewhere else. In fact information technology's estimated that even just a one-2nd delay in loading tin toll Amazon $1.half dozen billion in sales.
Sure, that'south not a sum of money that whatever food photographer has the luxury of worrying about. Nonetheless, even a couple of precious seconds tin have a huge bear upon on your traffic, engagement, and income opportunities.
The RAW image produced past your camera is usually much bigger in dimensions than information technology volition always be viewed at on your blog or website. Of grade, when yous save photos for Instagram and upload them to the app, they will automatically exist resized past the algorithm. Simply that unremarkably isn't the case with websites and blogs.
So if you lot don't resize your photo earlier uploading, your readers are going to end up downloading a lot of unnecessary data – resulting in slower loading times and more information usage! On tiptop of which, unless you particularly want to run into your work beingness used for free by random strangers, I don't recommend uploading high resolution files to the internet anyway.
The size that your images can be displayed at on your website will depend on your theme or website settings, and the device that your reader is viewing the image on.
Yous want to upload your photos at the largest size they will ever be displayed. So if your maximum content width is 640 pixels, your photos should be uploaded 640px wide. Platforms such as WordPress will then automatically resizes your photos for smaller devices such as tablet and mobile.
To notice out your maximum content width, you tin check in your theme settings or utilise the inspect tool in Google Chrome.
Bonus Tip: If yous want your images to show up super well-baked and abrupt on "retina" screens (which yous should – nearly Apple devices at present use retina screens!), you'll need to upload your photos at double the size of your maximum content width.
And so yous need to use a plugin to generate retina images. I use WP Retina 2x as I detect it super simple to apply, and it integrates with WordPress' built in functionality really well.
Image SEO Optimization – Tips and Best Practices
Having covered how to save photos for Instagram etc. without compromising on image quality, in this section I run through my top image SEO tips for ensuring that your photos don't get permanently swallowed up past Google the moment y'all upload them to the web.
File Names
In order for your nutrient photos to testify upwards in Google Image Search (and as results on Pinterest), you lot need to make them "readable" for search engines. With this in heed, one of the nearly fundamental prototype SEO best practices is simply naming your files correctly.
When you relieve photos for the web, don't simply leave them with the original proper noun that was given to them past your camera; e.g. "DC00021.jpg". Instead, proper noun them descriptively in evidently English language.
If you lot've decided on a keyword (or keywords) for your postal service, y'all should include these in your file name. For example, "vegan-chocolate-cake-1.jpg" is a good, descriptive and natural file name.
What's more, you lot will want to include your ain name in the file name too, so that anyone Googling you tin find your work.
Skillful paradigm SEO means writing clear and concise file names so that Google can easily read your pictures and render them as search results. The file names should be updated earlier you upload your photos into your WordPress media library.
Bonus Tip: the naming of files is less important when you save photos for Instagram, every bit this data will not be viewable once the images have been uploaded to the platform anyway.
Strip Unnecessary Metadata
While removing metadata doesn't make a huge departure to the file size of your photos, it is still an important step and keeps your images nice and clean for sharing on the internet.
I strip all the data except for "copyright information". You can gear up custom copyright information in the settings of both Photoshop and Lightroom.
Bonus Tip: You can safely skip this step when you save photos for Instagram, as the IG algorithm strips metadata from all images uploaded to the platform anyway.
Alt Text
Just as with a file name, the "alt text" (culling text) should be filled in with a relevant clarification of your image.
Alt text will exist displayed on your website or social media should the images fail to load for some reason. Alt text is also the information that anyone visually impaired using a screen-reader will be provided with equally a stand-in for the actual image.
That's all very well, merely is alt text important for SEO?
The reply is a resounding "yes." Adding alt text to your files volition help your website rank better in search results and is therefore an essential part of the image SEO process.
This being the instance, you volition want to add a unique description of the image, including keywords, to every file you lot upload.
Too, when writing the alt text, keep in mind that Pinterest volition employ this as the description for your Pin. This is of import even if you lot don't have a Pinterest account, considering whatever image from around the web can be uploaded to Pinterest by other users in simply a couple of clicks. So if you actually want to make a good chore of your image SEO, brand sure that your alt text description is snappy and appealing enough that people volition be intrigued and desire to click through to your blog or website if they find your work on Pinterest.
Bonus Tip: Again, Instagram automatically removes this metadata from images equally they are uploaded. With that said, though, you can – and probably should – add alt text to your Instagram images in one case they are on the platform and ready to post.
To do this, select Advanced Settings, and from here become to Accessibility and choose Write Alt text. Add your text and hitting Done.
You tin can even add together alt text to images that you've previously posted. Simply go to the mail service in question, select the three fiddling dots at the meridian right, tap Edit, and then click Edit Alt Text to the bottom right of the image.
Last Thoughts
When yous salve photos for Instagram or whatever other social media network, it's essential that yous do information technology following the optimum parameters for that particular platform. And while the requirements are ordinarily a little less strict when you save images for websites and blogs, you lot should nonetheless make learning how to optimize images for the web one of your elevation priorities before sharing your photography with the world.
Simply put, when you optimize images for web and social, you are making certain that your work will be viewed at its very best. And after all, why go to all the trouble of producing groovy images if you lot're only going to compromise them by the employ of incorrect export settings?
Similarly, it makes little sense to save your images for the web using the correct export settings if in the end nobody will see them considering yous have not optimized them for SEO. Clearly then, every photographer needs to have at least a basic agreement of paradigm SEO.
If you've read this far, though, y'all now possess all the necessary skills and noesis to salvage photos for Instagram so that they don't go mangled by the algorithm; to fully optimize images for spider web and social media more generally; and to correctly implement image SEO optimization to ensure that these photos show up in Google. Give yourself a loftier five!
Before yous get, don't forget to grab your free spider web optimization guide!
Complimentary Resource
Free Resource
Optimize your Food Photos for the Web
Optimize your Food Photos for the Web
Free Nutrient Photography Optimization Checklist
Optimize your food photos for your nutrient weblog or website and make sure your site runs efficiently, without sacrificing any quality!
We respect your privacy. By signing upward, yous concur to our use of your name and email equally per our Privacy Policy
Free Food Photography Optimization Checklist
Optimize your food photos for your food web log or website and brand sure your site runs efficiently, without sacrificing any quality!
We respect your privacy. Past signing up, you agree to our use of your name and email equally per our Privacy Policy
Source: https://foodphotographyacademy.co/blog/optimizing-food-photos-for-web/
0 Response to "Food Instagram How Many Photos Should You Upload"
Post a Comment